Power Supply DIY Project
Safety Precautions : First thing to be concerned about if you are going to take on building a power supply as a project is safety. Remember that you will be working with 115 volt AC power from the wall within this device and it misused, that amount of power can be deadly. This project should also not be the first time you ever used a soldering iron ... and good basic building techniques must be followed to build a reliable & safe unit. Pay close attention also to the specs for components in the parts list. Incorrect or misassembled parts can cause serious problems, up to and including an explosion ! Do not operate one of these widgets with the cord plugged in and the box open and likewise to not operate in or around water. Using a three wire power cord with the ground (green wire) attached to the housing provides added insurance and safety against potential problems and is recommended.
Construction Tips : There are a number of soldered connections in this supply. To make good solder joints use a good grade of 60/40 rosin core "electrical" solder. Make sure that you never use acid core solder or acid flux in any electrical connection. The acid is highly corrosive and eats copper wires for lunch .... not what you want here. You will need to secure wires and components within the enclosure. To do this you will need pop rivets (preferred) to secure the transformer to the housing, double stick servo tape to hold down the capacitor(s), plastic wire ties to hold wires in place and a sturdy screw and nut (preferably with a metal lock washer) to hold the full wave bridge to the aluminum case (required for heat sinking). In addition, all high voltage (115 volt AC side) must be fully insulated using heat shrink tubing and potentially a blob of silicone glue/caulk on the back of the on/off switch. Insulating the low voltage side connections (after the transformer) is not required, but certainly recommended. If the 2 wire polarized plug is used, make sure the hot side of the current (black wire inside the 115 volt electrical box) is the wire that goes through the on-off switch (improved safety if wired that way !). Make sure the box is fully enclosed and buttoned up before plugging in the power cord.
Parts List (suggested hardware for 5 Amp "12 volt" supply)
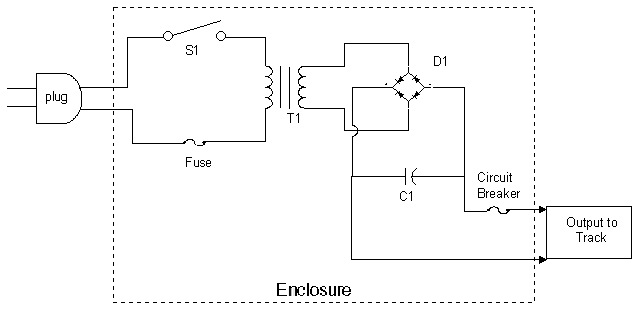
T1 - Transformer : 12 volt secondary, 115 volt primary, 3 amp rating
C1 - capacitor : 15,000 microfarad polarized electrolytic 25 volt rating (or larger)
S1 - switch : miniature/subminiature toggle switch single pole, double or single throw, 3 amp
D1 - full wave rectifier bridge : 25 amp 50 PIV (peak inverse volts) aluminum case preferred
Fuse : 2 to 3 amp rating (enclosed unit recommended)
Circuit Breaker : 5 amp rating (fuse holder and 5 amp fuse can be used)
Enclosure : Aluminum 2 part case (do not use plastic)
Power cord : 2 wire (polarized) or 3 wire (3 wire recommended)
Rubber grommets (2) : to isolate incoming / outgoing wiring from enclosure
Rubber feet (3/4) : stick on recommended (optional)
Banana Plugs - red/black (optional)
Wire : 14 gage minimum recommended
Comments on da parts : The fuse used is on the high voltage side and as such should be enclosed or otherwise insulated (Professor Motor can provide an enclosed glass fuse holder {$1} or you can also use a 2 amp circuit breaker {$2.50 Professor Motor part number PMTR-2035} or other such device , open frame glass fuse holders are not recommended. The transformer choice may seem odd, but transformers are rated in RMS terms (root mean square), the resulting current capability is actually 1.4 times the RMS rating, or in this case 1.4 x 3 amps = 5.2 amps. In a similar way you will find that the finished supply will actually produce measured voltage output no load (without anything attached to the output) of approximately in the 16 to 16.5 volt range. If the 3 wire power cord is used, pop rivet a soldered-on eyelet connector (attached to the green wire !) to the aluminum case from inside that housing.
Return to Tech Info Page
|
|
|
